
[youtube id=”GDE0jYgSYls” mode=”normal” align=”center”]
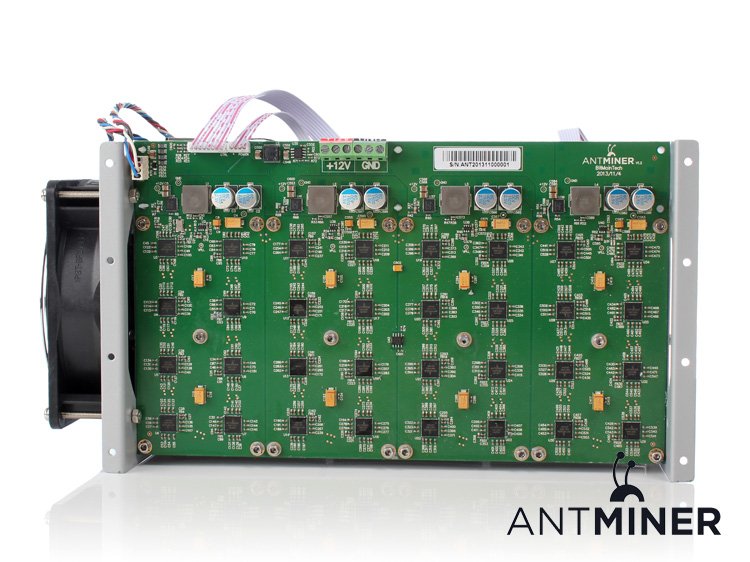
The ant miner S1 is one of the best BTC miner to start with in mine opinion.
Actually to be honest with that 2.77$ / GH/s rate it s even good for serious miners as well. The reason why I said it is great for newbies is because it is soo easy to use.
As you can see from our video review or from the set up tutorial. The ant miner is a stand alone device. No need for a dedicated computer.
All you have buy is a PSU (power supply unit). Other than that you are good to go and start mining.
As the bitcoin gets more widely know and used devices like the ant miner S1 are very much needed.
Packaging:
Just like the machine itself, SIMPLE but does the job!
The product comes in a regular box. The machine is carefully wrapped around with cacum molded plastic foil so it wont get damaged.
Miner Source.net customer service:
We got the machine directly from Minersource but we have asked two friends who ordered them directly from them so we are able to let you know real customers experience. Our friends live in Budapest, Hungary. They ordered the miners and paid with bitcoin. They said the process was as easy as a piece of cake. They got e-mail after the cleared payment. They were informed about all order status. The order left the warehouse in 2 days and they got the tracking number. They received the machine in a week.
All in a all an antminer is a great deal.
We have tested minersource.net and we can say theat it is great to see a legit source to buy miners from.
Buy it here:
http://minersource.net/products/bitmain-s1-dual-blade-180gh-400w-asic-miner
Basic configuration:
First of all, connect the network cable to the antminer. If you want to switch to wireless mining later on, you will still need to do the very first adjustments via utp cable.
1. Connect Antminer to the local network
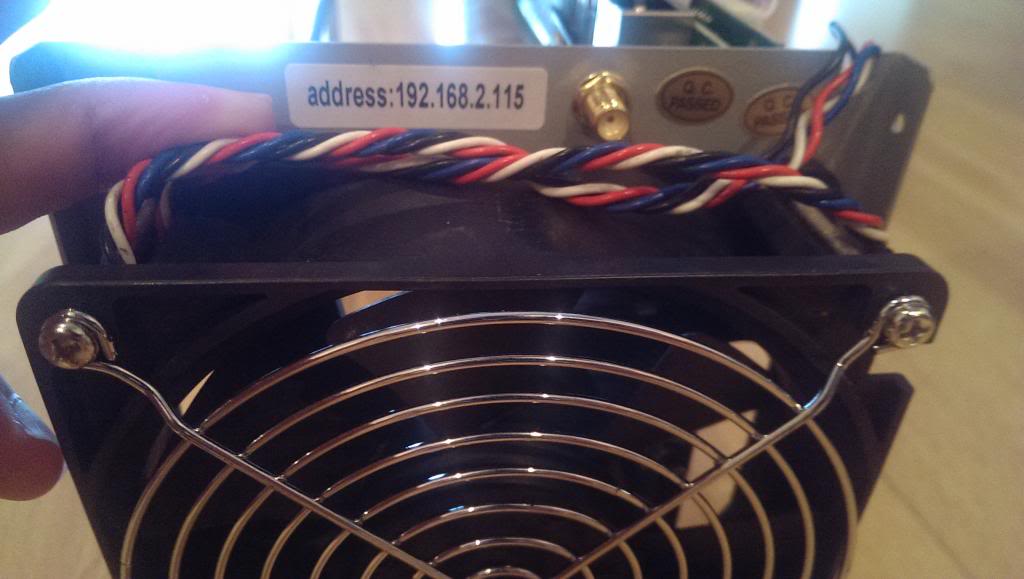
2. Find out antminers IP address (It is written on the front-top of oyur miner above the fan)
3. Try to connect to the miner
4. (optional) Temporary configuration to access miner
5. Setup DHCP and LAN
6. Wireless mining
7. Cgminer configuration
Overclocking
1. Connect the Antminer to the local area network.
3. Put your miners IP in your browsers URL field. If it is not loading, you’ll have to configure a DHCP or another static network and gateway on your computer.
4. Temporary configuration to reach miner (WindowS)

– Go to Network and Internet Settings > Change adapter setting
– Find Local Area Connection > Double click
– Click on Internet Protocol verison 4 (IPv4)
– Hit “Properties”
On the General tab please change from automatic connection to the “use following address”
– IP address: you just give your computer a new statick IP
– Subnet mask: 255.255.255.0
– Default gateway 192.168.2.1 or 192.168.2.1 (it must look like your miners IP, THE FRONT 3X3 characters)
– After that connect to your miner in your browser. The username / password is root / root.
5. Set up Antminer connection to DHCP
Go to the Network tab and click “Edit” on WAN settings. Than change the protocol to DHCP Client, than Save & Apply
After that, you might lose your connection to the miner. To find the miners new IP address, you can use Angry IP scanner (works on linux, windows and mac) than connect to it.
Wireless mining
Go to the newtork tab and choose Wifi. Scan the avaialable networks and and connect to your Wifi and enter your password.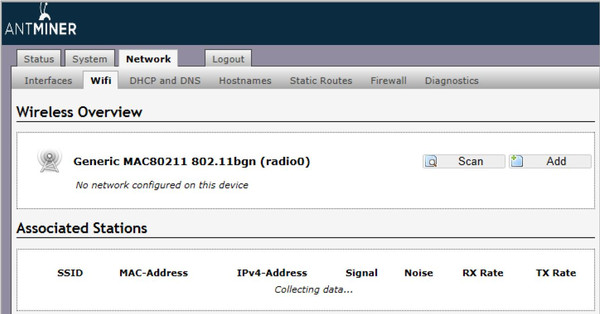
Click add when you find your wireless signal and enter your network settings like you would any standard Wi-Fi device.
If it is not working for you, here i the SKU for an alternative device: Netgear Model#: WNCE2001-100NAS.

Cgminer configuration
Pool 1: stratum+tcp://us1.eclipsemc.com:3333 (the pool mining address example)
Pool 1 worker: username_workername (workerís name from your mining pool account)
Pool 1 password: 123 (workerís password from your mining pool account)
Overclocking
Ssh into your miner (windows: putty client, mac/linux terminal)
ssh root@192.168.1.113 (your miner ip)
Password: root
You’ll see a terminal, type: vi /etc/config/asic-freq
change timeout to 36, freq_value to ‘0780’, ‘chip_freq’ to 400.
Normally these values are already given, just put a # before the the old lines and delete the # from the beginning of the new lines.
VI for dummies:
after you hit “vi /etc/config/asic-freq” you will see and editor. Press I once to get in the insert mode, so you can change the lines. navigate with the arrow keys. If you are done hit the “ESC” button once than type (type, not copypaste) :wq than hit enter.
If you are done type logout than restart you miner.
Have fun and note that if you overclock you loose your warranty!
