
One of Windows 10’s coolest security features may be rendered totally useless if you don’t take the correct precautions. Disk encryption is built in and activated by default on this latest iteration of Windows, but a hidden function of Windows may allow Microsoft to access your encrypted data.
Also read: Senator John McCain Pushing Government Access to Encryption Protected Data


This vulnerability should be a point of concern for everyone that uses Windows 10, but Bitcoiners should be especially weary of who has access to their encrypted disks. If you store a desktop wallet or files containing private keys or seeds on an encrypted disk running Windows 10, Microsoft could theoretically gain access to your bitcoins. Of course, Microsoft itself stealing your coins isn’t very likely, but what if their servers become compromised, and a nefarious actor gains control over them?
Fortunately, The Intercept put together a guide on how to delete your recovery key from your Microsoft account, which will prevent your system from uploading the key to Microsoft’s servers:
How to delete your recovery key from your Microsoft account
Go to this website and log in to your Microsoft account — this will be the same username and password that you use to log in to your Windows device. Once you’re in, it will show you a list of recovery keys backed up to your account.
If any of your Windows devices are listed, this means that Microsoft, or anyone who manages to access data in your Microsoft account, is technically able to unlock your encrypted disk, without your consent, as long as they physically have your computer. You can go ahead and delete your recovery key on this page — but you may want to back it up locally first, for example by writing it down on a piece of paper that you keep somewhere safe.
If you don’t see any recovery keys, then you either don’t have an encrypted disk, or Microsoft doesn’t have a copy of your recovery key. This might be the case if you’re using BitLocker and didn’t upload your recovery key when you first turned it on.
When you delete your recovery key from your account on this website, Microsoft promises that it gets deleted immediately, and that copies stored on its backup drives get deleted shortly thereafter as well. “The recovery key password is deleted right away from the customer’s online profile. As the drives that are used for failover and backup are sync’d up with the latest data the keys are removed,” a Microsoft spokesperson assured me.
If you have sensitive data that’s stored on your laptop, in some cases it might be safer to completely stop using your old encryption key and generate a new one that you never send to Microsoft. This way you can be entirely sure that the copy that used to be on Microsoft’s server hasn’t already been compromised.
Generate a new encryption key without giving a copy to Microsoft
Update: After this article was published, Ars Technica wrote about a method for preventing the recovery key you sent to Microsoft from being able to unlock your disk that doesn’t require upgrading from Windows Home to Pro or Enterprise. However if you already have a Pro or Enterprise edition, following the rest of the steps in this article might be simpler.
In order to generate a new disk encryption key, this time without giving a copy to Microsoft, you need decrypt your whole hard disk and then re-encrypt it, but this time in such a way that you’ll actually get asked how you want to backup your recovery key.
This is only possible if you have Windows Pro or Enterprise. Unfortunately, the only thing you can do if you have the Home edition is upgrade to a more expensive edition or use non-Microsoft disk encryption software, such as BestCrypt, which you have to pay for. You may also be able to get open source encryption software like VeraCrypt working, but sadly the open source options for full disk encryption in Windows don’t currently work well with modern PC hardware (as touched on here).
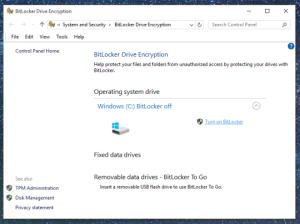
Go to Start, type “bitlocker,” and click “Manage BitLocker” to open BitLocker Drive Encryption settings.
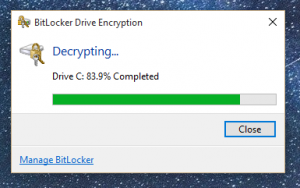
From here, click “Turn off BitLocker.” It will warn you that your disk will get decrypted and that it may take some time. Go ahead and continue. You can use your computer while it’s decrypting.
After your disk is finished decrypting, you need to turn BitLocker back on. Back in the BitLocker Drive Encryption settings, click “Turn on BitLocker.”
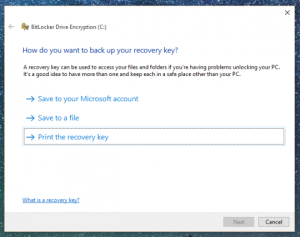
It will check to see if your computer supports BitLocker, and then it will ask you how you want to backup your recovery key. It sure would be nice if it asked you this when you first set up your computer.
If you choose to save it to a file, it will make you save it onto a disk that you’re not currently encrypting, such as a USB stick. Or you can choose to print it and keep a hard copy. You must choose one of them to continue, but make sure you don’t choose “Save to your Microsoft account.”
On the next page it will ask you if you want to encrypt used disk space only (faster) or encrypt your entire disk including empty space (slower). If you want to be on the safe side, choose the latter. Then on the next page it will ask you if you wish to run the BitLocker system check, which you should probably do.
Finally, it will make you reboot your computer.
When you boot back up your hard disk will be encrypting in the background. At this point you can check your Microsoft account again to see if Windows uploaded your recovery key – it shouldn’t have.
Now just wait for your disk to finish encrypting. Congratulations: Your disk is encrypted and Microsoft no longer has the ability to unlock it.


By following these steps, you can rest a little easier; Microsoft won’t have access to your encrypted information, so you can be sure your bitcoins and other private files are that much safer.
Please visit The Intercept and read their article in its entirety. Don’t forget to show your thanks to them for creating this guide to make your Windows 10 system more secure.
What do you think about this hidden “feature” in Windows 10? Let us know in the comments below!
Guide and BitLocker screenshots courtesy of The Intercept