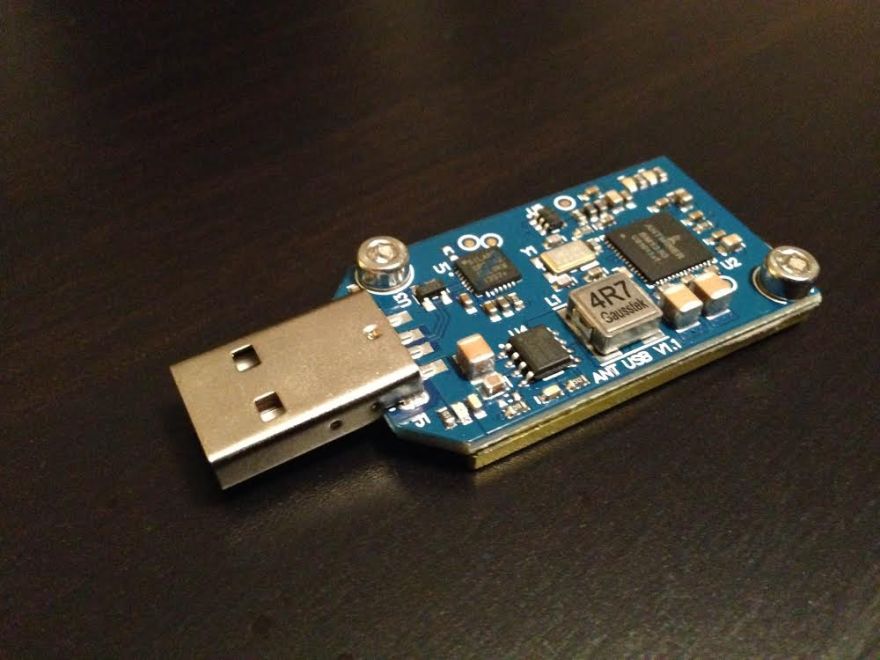
Bitmain Antminer U1
Bitmain’s new mini bitcoin miner has just landed in our hands at the North American Bitcoin Conference in Miami. It is a rather small and compact bitcoin miner. It can be used by individuals without mining farms or it can be an ideal solution for office use. Power efficient and silent without fans or any other moving parts, it has only a quite large heatsink.
Why buy it?
Small, efficient and a fast alternative to start mining, it represents a good start in the business. It can build up small farms, and enables you to try the best available mining pools and cooling solutions to prepare for the big miners later on. You know, mining is always the hard way, but it has it’s own beauty.
The product
It is a small USB drive – sized miner, with a large heatsink on the back. It comes with dimensions of 3.0”x1.4”x0.5” (inches), weighing 2.1 ounces. It is a bit wider than an ordinary usb stick, so when using hubs, try to avoid horizontal ports. It is operating on 58 Centigrade Celsius, being a bit too hot to touch, so try holding it on the side.
Opinion
Keeping in mind the up to date conditions, it is hard to estimate the exact ROI value for a small miner like that. If you go for straight profit, try some of the alternative coins. One important rule about mining is, if you are counting on the price raise of bitcoins, don’t buy a miner, invest in the bitcoins and wait. Of course, these little pals are not the ultimate money making machines, but great devices to be part of the community and to mine your own bitcoins.
Everyday use
I can imagine the Antminer U1-s as an everyday silent device in the back of your office PC, or maybe connected to your home NAS or server. While the Antminer is efficient and easy to use. I had some trouble with cgminer. On the other hand, with bfgminer it was easy as a pie (you can find detailed instructions below). As much as I was concerned, it was much more profitable than the previous models by ASICminer (333 Mh/sec, can be overclocked to 450 Mh/sec). The immediate availability of the product is a rarity in this industry, so that was a big plus. In my opinion, I’d buy it as a hobby device, to connect it to my continuously running Raspberry Pi at home. I’m a bit concerned about the heat, so I would leave it in charge for a few days, to see what happens.
Let’s see the pure details about the chips:
Chip specs: BM1380
The AntMiner Solution uses a BM1380 hashing chip, which has been developed privately over the past 7 months by Bitmain. Bitmain team has been working on it day and night; some of their engineers got sick several times due to overwork. We combined the wisdom of a mature IC design process with several innovative or even aggressive power saving techniques.
Process Node: 55nm
Package Type: QFN56
Packaged Chip Size: 8 mm x 8 mm
Number of Cores: 8
Die size: 12 mm^2
Core Voltage: 0.75V
Core Frequency:196 MHz
Hash Rate: 1.568 GH/s
Power Consumption: 0.68 J/GH (chip level)
Over clocking performance is still to be tested, before that we need modify our software a little bit.
Setup tutorial – Windows
1) Download/Install this driver: http://www.silabs.com/Support%20Documents/Software/CP210x_VCP_Windows.zip
2) Download bfgminer windows version here: http://bfgminer.org/
3) Unzip bfgminer files to your computer; for example C:/miner/
4) Create a shortcut to the bfgminer.exe file
Right click on your desktop and choose New -> Shortcut; use the browse option to locate the bfgminer.exe file that you unzipped earlier.
5) Right click on the new shortcut and click “Properties”. In the “Target:” update to show as follows (replace pool details with your own user):
C:minerbfgminer.exe -S antminer:all -o pool.url:3333 -u username -p password –set-device antminer:clock=x0781
6) Double click the shortcut to start BFGminer and start mining.
https://github.com/AntMiner/AntGen1/blob/master/manual/AntMiner-U1%20user%20guide.pdf?raw=true
Screenshot – 1.6 gH/s 2 miners – noname powered usb hub Heat: 58Celsius
Screenshot – 2.0 gH/s 1 miner – noname powered usb hub Heat: 65 Celsius(?!)
Cgminer is officially not supported yet, try it with the zadig driver, here is a sample code:
c:cgmineru1cgminer.exe –bmsc-options 115200:20 -o stratum+tcp://de1.miningpool.co:10701 -u grabber.uno1 -p x –bmsc-freq 0781
With Linux (bgfminer):
Run the following commands to install dependents, download bfgminer source and build it:
sudo aptitude install autoconf libtool libncurses-dev yasm curl libcurl4-openssl-dev libjansson-dev pkg-config libudev-dev libusb-dev uthash-dev libsensors4-dev libmicrohttpd-dev libevent-dev libusb-1.0-0-dev
git clone https://github.com/luke-jr/bfgminer
cd bfgminer
./autogen.sh
./configure
make
To run bfgminer use a command such as (change our demo pool user with your own user):
sudo ./bfgminer -S antminer:all -o mint.bitminter.com:3333 -u bitcoinco_demo -p x –set-device antminer:clock=x0781
If you are using a Raspberry Pi do the following:
sudo nano /boot/cmdline.txt
Add the following code at the end of the first line (on the same line as the other text)
slub_debug=FP
