
The thriving state of the cryptocurrency markets isn’t just good news for investors. At this point in crypto’s evolution, it’s becoming an easier and more desirable place to work and play. And thanks to the buoyant markets and growing user acceptance of digital currencies, many more businesses and individuals are now willing to transact in crypto.
However, the reality of combining crypto and business can be a little daunting. Many standard invoicing and accounting platforms don’t yet support crypto, while many of the biggest crypto-native payment platforms like Coinbase Commerce are more geared towards e-commerce merchants and often require signing up for a plan.
Request Finance is now how many of the top DAOs and DeFi companies manage their crypto invoicing process. It’s based on blockchain, providing the benefits of a verifiable and untamperable trail of documentation and evidence of payment, which takes place peer-to-peer.
Since launching in October 2020, the platform has processed over $140 million in invoices, used by Aave, the Maker Foundation, and the Fantom Foundation. Users pay on a per-transaction basis with a low fee of just 0.1%, so it’s suitable for every size of enterprise from individual freelancers or large organizations.
Request currently supports over 31 cryptocurrencies, nine local currencies, and eight payment networks. It would be impossible to walk through every scenario, but this guide should provide a taster of how easy it is to streamline crypto invoicing with Request.
To get up and running, you’ll need a few things in place. Firstly, you’ll need a Request account, which is free and takes just a few moments to set up. You’ll also need a cryptocurrency wallet such as Metamask, Fortmatic, or any wallet that supports WalletConnect.
Creating a Crypto Invoice
From the dashboard in your Request account, you can choose “Create an Invoice.” You’ll go to a screen where you can customize your invoice.
You can customize most of the fields on the form, including the invoice and payment due dates and your own information as the invoice issuer.


Under the Client Information field, you can fill the form with your client’s name, address, and tax number if needed.
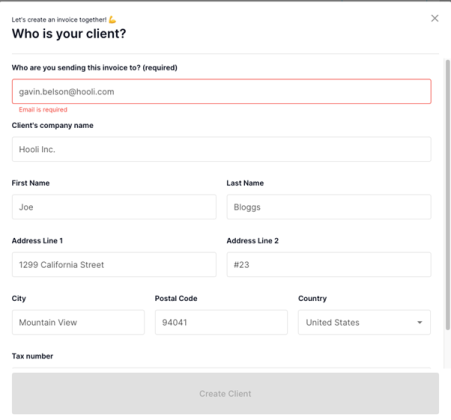
Each time you add a new client, Request will save it to your profile, making it easier to issue repeat invoices.
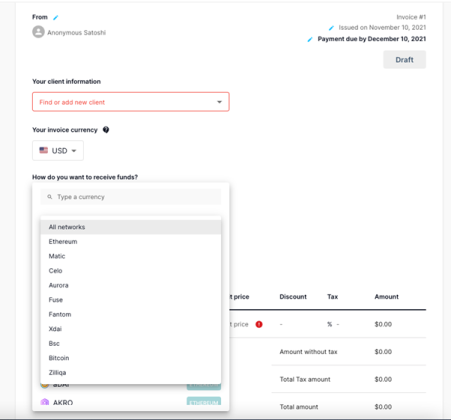
When you come to the currencies, you can choose the fiat currency of your invoice according to the billing currency of your business. For example, if your business is based in Germany, you’d select EUR.
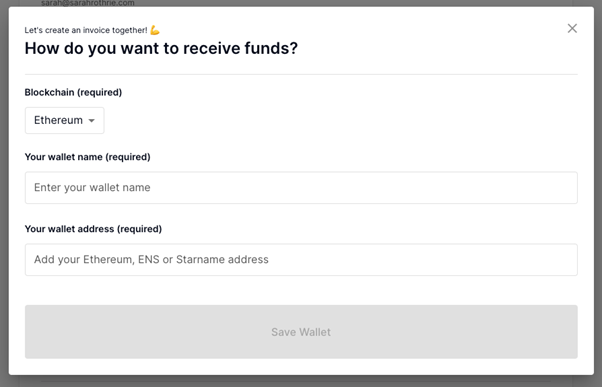
However, for the payment currency, you can choose to be paid in whichever supported cryptocurrency you wish. If you select to receive your funds in crypto, then you’ll need to select a currency and set up a compatible wallet. You can view the entire list and even lookup by network.
Then you’ll need to enter your wallet details.

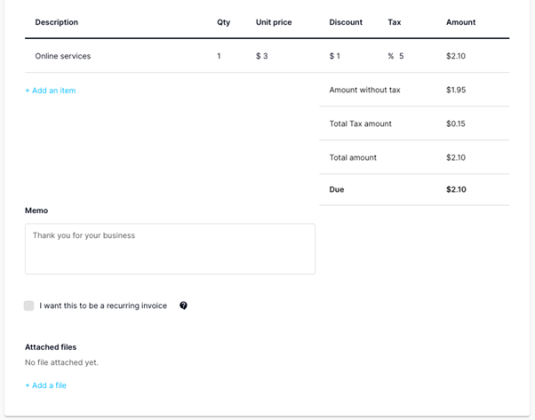
Finally, you’ll need to customize the details of your invoice, including the description, price and quantity, and details of any discounts or taxes. You can also enter a message or even set up the invoice as a recurring issuance, where you’ll be prompted to enter the frequency and end date.

If you need to stop at any point, you can save the invoice as a draft for later. But once you’re happy with all the details, you can click “create and send” to issue the invoice to your client via the Request network. Make sure you double-check your wallet address is correct!
You can also find a video tutorial for how to set up a Request invoice.
Making a Crypto Payment
On the other side of the equation, you can also use Request to manage your business payments by asking your suppliers to invoice you using your registered email address. When an invoice comes in, you’ll be notified and can view it via your dashboard when you log in.
When you click on the invoice, you can see the details of the invoice, including the requested payment method. It’s good practice to accept the invoice, as it notifies the issuer that you’re aware of the invoice and have approved it, even if you don’t pay it right away.
To pay the invoice, simply click “Pay Now” at the top of the screen. You can then choose your wallet type, connect it, and all the payment details are populated automatically. You’ll be asked to approve the transaction via your wallet, and once the blockchain confirmation takes place, the invoice is notified as paid to the issuer.
You can also use Gnosis Safe to enable batch payments. Within the Gnosis Safe interface, select the Apps section and find Request Invoicing. You’ll be able to view the Request Interface from within Gnosis Safe.
Firstly, you’ll need to ensure that each invoice you want to include in the batch payment has been approved using the “Accepted” status. You’ll see the status update in your dashboard.
You can then use the “Batch payment” button, which will allow you to select the invoices you want to pay. You can then initiate the payments and go through the normal Gnosis Safe approval process.
Request also has video guides covering how to make a payment and how to carry out batch payments.
More to Come!
Request Labs, the developer of the application, is working on more features and integrations, such as allowing users to make payments in fiat that are received crypto and handling other payment features such as payrolls or expenses.
Source: Depositphotos